Getting Started with KuberIDE
Learn how to compile and deploy Plutus smart contract and deposit and withdraw assets from the contract using KuberIDE
KuberIDE is a browser based IDE where you can write and test Plutus smart contracts without requiring any setup. In this guide, we'll show you how easy it is to deploy a Plutus smart contract in a few minutes.
Example Contract
Here as an example we have a smart contract where a sender can send deposit the funds and a withdrawer can withdraw the funds from the contract. But the catch is, to withdraw (also called redeem), a transaction must be sent with 42 as a redeemer.
{-# LANGUAGE NoImplicitPrelude  #-}
{-# LANGUAGE TemplateHaskell    #-}
{-# LANGUAGE NamedFieldPuns     #-}
{-# LANGUAGE TypeOperators         #-}
{-# LANGUAGE OverloadedStrings     #-}
{-# LANGUAGE ScopedTypeVariables #-}
{-# LANGUAGE MultiParamTypeClasses #-}
{-# LANGUAGE DataKinds #-}

module Contract
where

import GHC.Generics(Generic)
import PlutusTx.Prelude
import PlutusTx hiding( txOutDatum)
import Plutus.V2.Ledger.Api
import qualified PlutusTx.Builtins as Builtins

{-# INLINABLE mkValidator #-}
mkValidator :: BuiltinData -> BuiltinData -> BuiltinData -> ()

mkValidator _ r _
    | r == Builtins.mkI 42 = ()
    | otherwise            = traceError "wrong redeemer!"

validator :: Validator
validator = mkValidatorScript $$(PlutusTx.compile [|| mkValidator ||])
In the code above, if you look carefully at mkValidator you can find that only if the redeemer used is 42, then the validation will be successful. This is the onchain code or the contract.
Compiling Contract using KuberIDE
Lets deploy it using KuberIDE. KuberIDE has an inbuilt Plutus Compiler so compiling a Plutus smart contract is a button away. Head over to https://kuberide.com/ide/haskell and paste the above contract code into the editor.
If you do not have an account yet, no problem. Simply Sign In using Google or GitHub and a free account will be created for you.
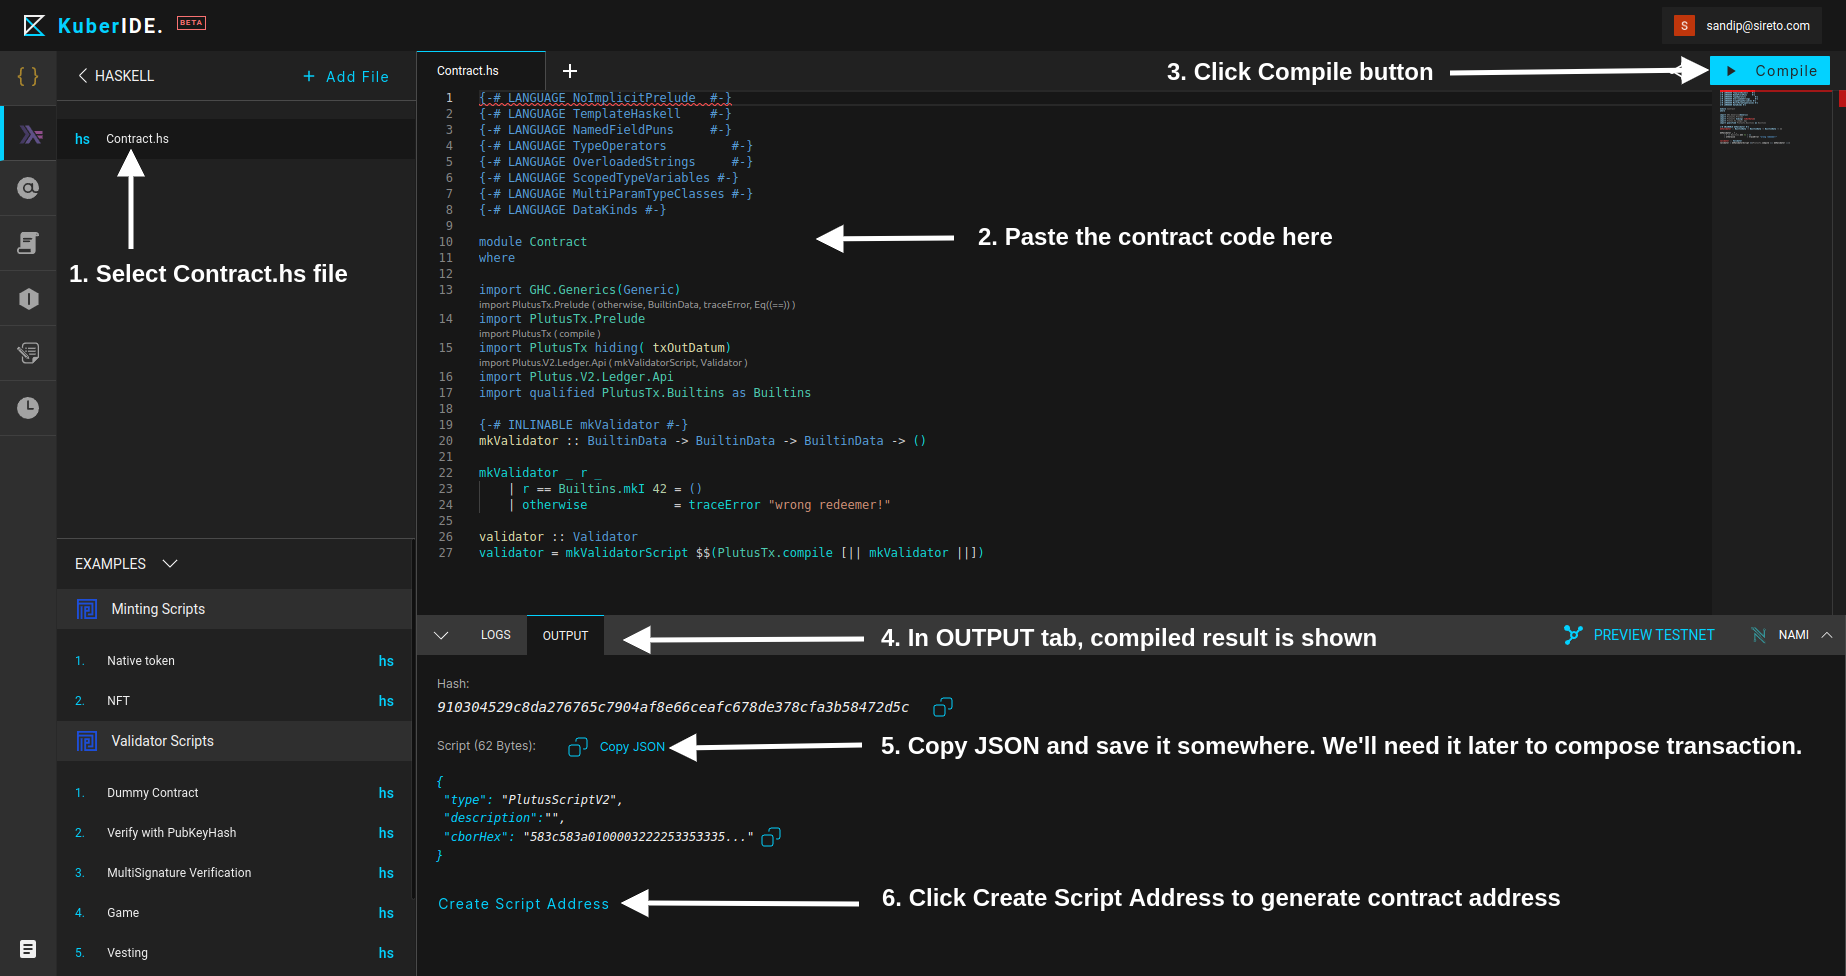
Here are the simple steps to follow to compile the code as highlighted on the image above.
- Select
Contract.hsfile. This file is present by default. If you do not see this file, make sure that you're on the current URL: https://kuberide.com/ide/haskell - If
Contract.hsfile is selected, in the main section you'll find a Code Editor. If there is any previous code on the editor, clear the code to make it blank. Then paste the earlier contract code. - Next, click the bluish
Compilebutton near the top right to compile the contract code. It will show loading icon when clicked until the compilation finishes.
Note: On the bottom sheet, network selection and Wallet selection option is provided. Make sure to select the correct network and the wallet for you eg. Preview Testnet and Nami wallet is selected in this guide. It is very important that correct network is selected before compiling. - Once the compilation is complete,
OUTPUTtab on the bottom section appears which shows the compilation result. - On the OUTPUT tab, you'll see a
Copy JSONlink. Click on it to copy the content. This is called the Script JSON which we'll need to compose withdraw/redeem transaction later to interact with the contract. Save this copied JSON somewhere so you can use later. - Toward the bottom, you'll see
Create Script Addresslink. Click on it. It'll open left sidebar with titleCOMPOSE/DECOMPOSE ADDRESS. We'll use this utility to compose smart contract address.

7. On the COMPOSE/DECOMPOSE ADDRESS utility sidebar, make sure to select the correct network. In this guide, we're using testnet. Unless the contract needs to be deployed to the mainnet, always select testnet for other environments like Preview, PreProd etc.
8. On the Payment Credential, Script Hash is automatically set. But in case, it is not filled, copy the Hash from the OUTPUT tab. The Stake Credential section can be left empty.
9. Click Compose button to compose an address for the smart contract.
10. An address will be generated on the RESULT section at the bottom of the sidebar. Copy the address. This is our contract address.
Deposit Ada to the contract
Now that we have the contract address, lets deposit some Ada from the wallet to the contract.
For this, we compose a transaction where we set the output address to be the contract address and amount as the amount of Ada we want to deposit. Unlike normal wallet addresses, to send some Ada (and assets) to the contract, we need to provide an additional data called datum . In our case, we are simply sending Ada to the contract, we use empty constructor of the datum. Unfortunately, we cannot leave it blank. Leaving it blank makes the deposit Ada impossible to redeem later.
Now to compose transaction, we again use KuberIDE. But this time, instead of the contract editor, we use transaction compose JSON editor called Kuber (See, where the name KuberIDE came from). For this, go to: https://kuberide.com/ide/kuber
The transaction to deposit 10Ada to the contract simply becomes the following:
{
    "outputs": [
        {
            "address": "addr_test1wzgsxpzjnjx6yankt3usftuwvm82l3ncmcmce73mtprj6hqs0se73",
            "amount": "10A",
            "datum":{"constructor": 0, "fields": []}
        }
    ]
}
Copy the above code and replace the address with your own contract address which you copied on Step 10 in the previous section.
Next, click on the top right Compile button to compile the transaction.
Note: Remember to select the correct network and the wallet. eg. Preview Testnet and Nami wallet are selected in this guide.
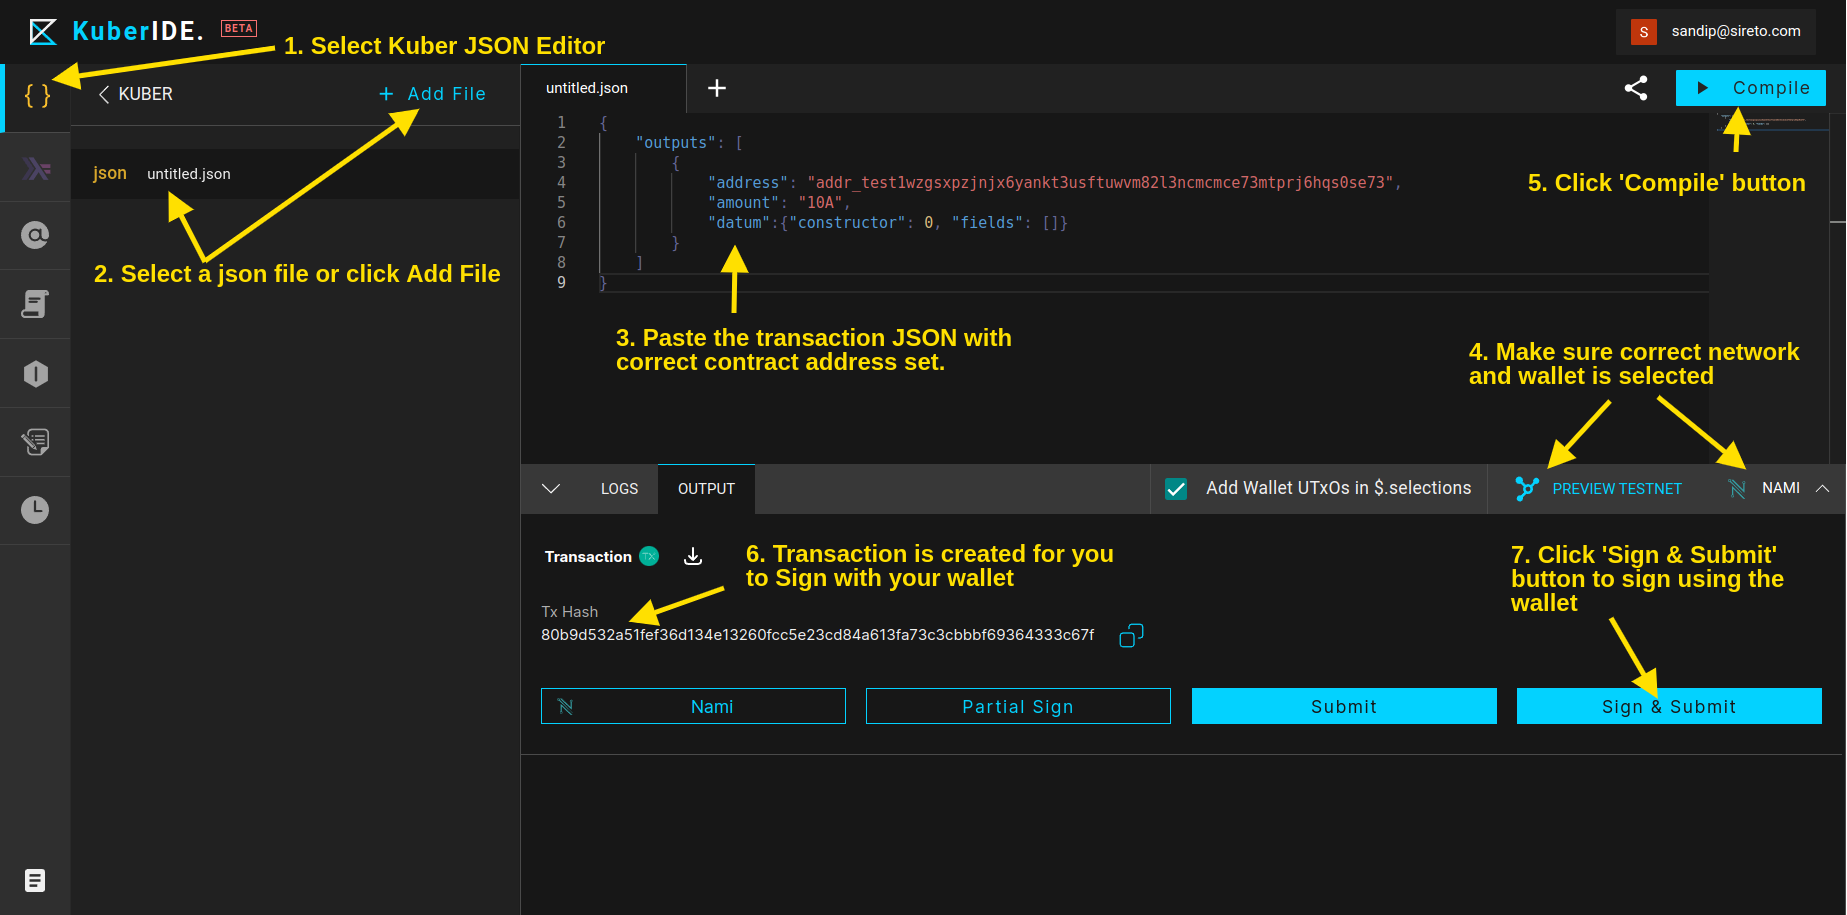
Here are the detailed steps:
- Select Kuber JSON Editor section on the IDE if it is not selected already.
- Select a json file or click
Add Fileif a file is not available. - Paste the above JSON transaction and replace the address with the contract address from the previous section.
- Make sure the correct network and wallet is selected.
- Click on
Compilebutton to compile the transaction. - Once the compilation is compile, you'll see the
OUTPUTtab on the bottom sheet with the transaction hash and a few action buttons. Copy and save the transaction hash. We'll need it to withdraw from the contract. - On the bottom right side of the
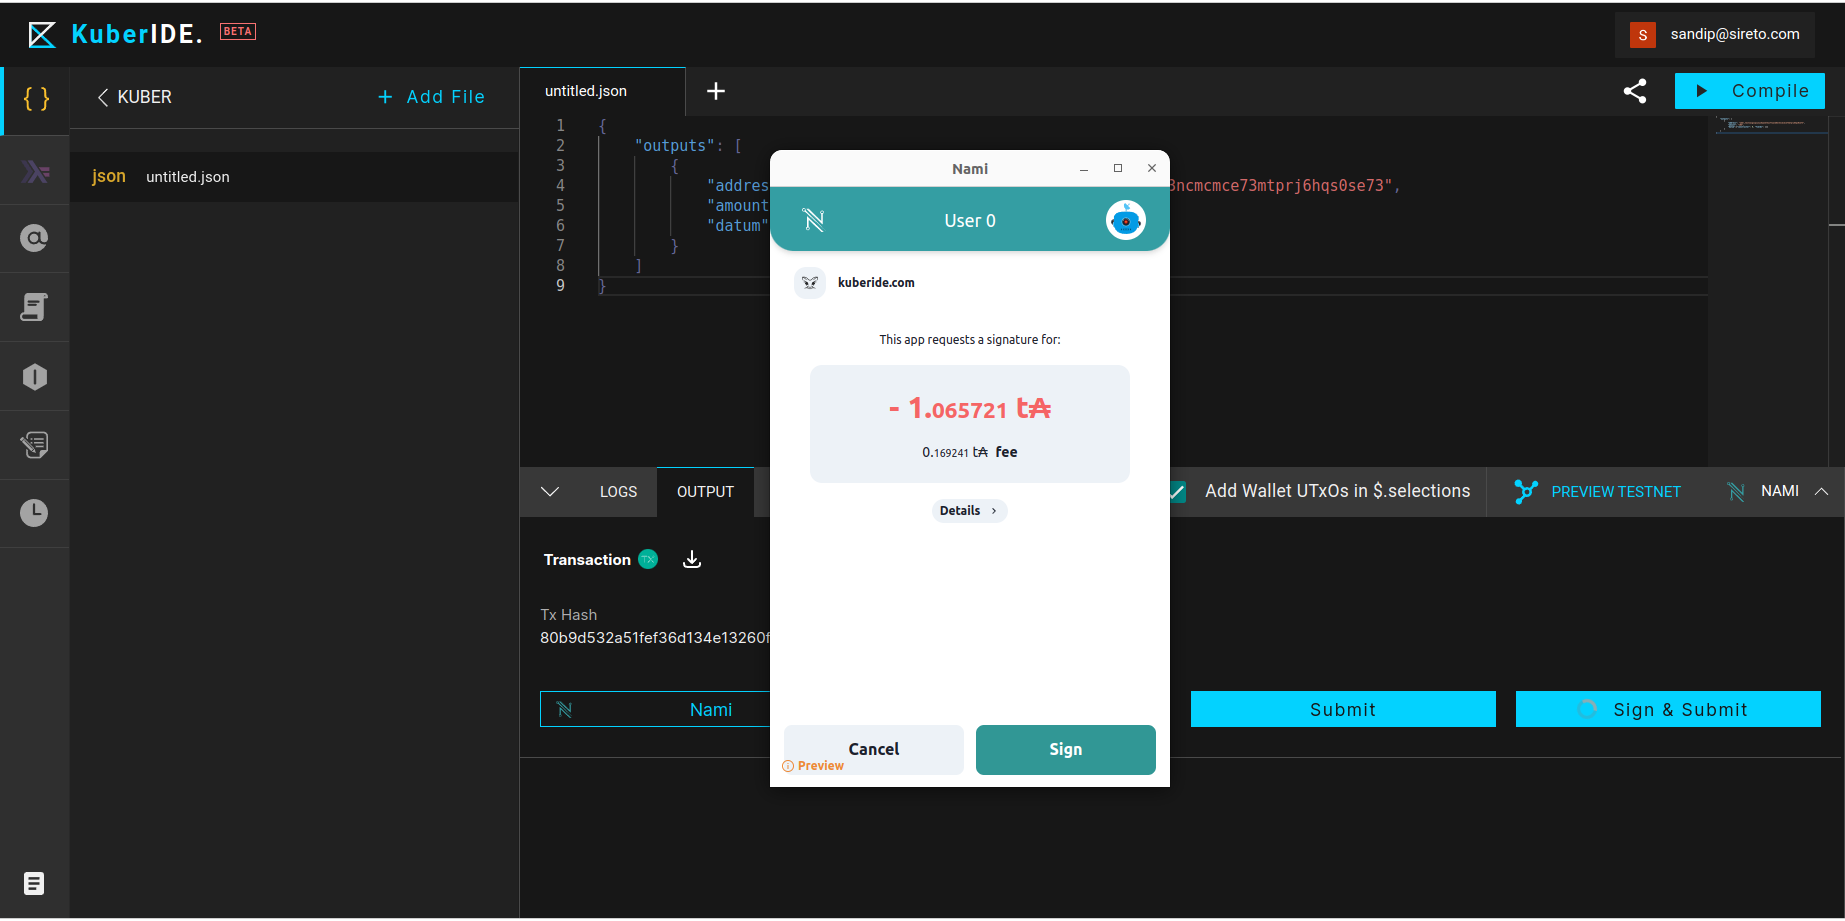
OUTPUTtab, you'll findSign & Submitbutton. Click on this button to sign the transaction. It'll open wallet pop-up window for you to sign the transaction as shown below. Once the signing is complete, the deposit is done. To let the transaction being mined, might need to wait a few minutes.
Withdraw from the contract
Now we want to withdraw from the contract a certain amount of Ada. If you remember at the beginning, we said the contract requires a redeemer of value 42 to withdraw from the wallet.
Here is an appropriate transaction that sets the redeemer with integer value 42. Also, note we have put the Script JSON that we copied in one of the previous section.
{
    "inputs": [
        {
            "utxo": "80b9d532a51fef36d134e13260fcc5e23cd84a613fa73c3cbbbf69364333c67f#0",
            "script": {"type":"PlutusScriptV2","description":"","cborHex":"583c583a010000322225335333573466ebc008dd4240a82440042440022008264c649319ab9c49010f77726f6e672072656465656d657221000041200101"},
            "redeemer": {"int":42}
        }
   ],
    "outputs": [
        {
            "address": "addr_test1qplrdfxgm2wxl74ggttfgvkrqz9hdht6xwq3r326h62cmn989k5m8uprgt299v2080aga7uqqkutycf97stwtskk40nskerus4",
            "value": "5A",
            "datum": {"constructor": 0, "fields": []},
        },
    ]
}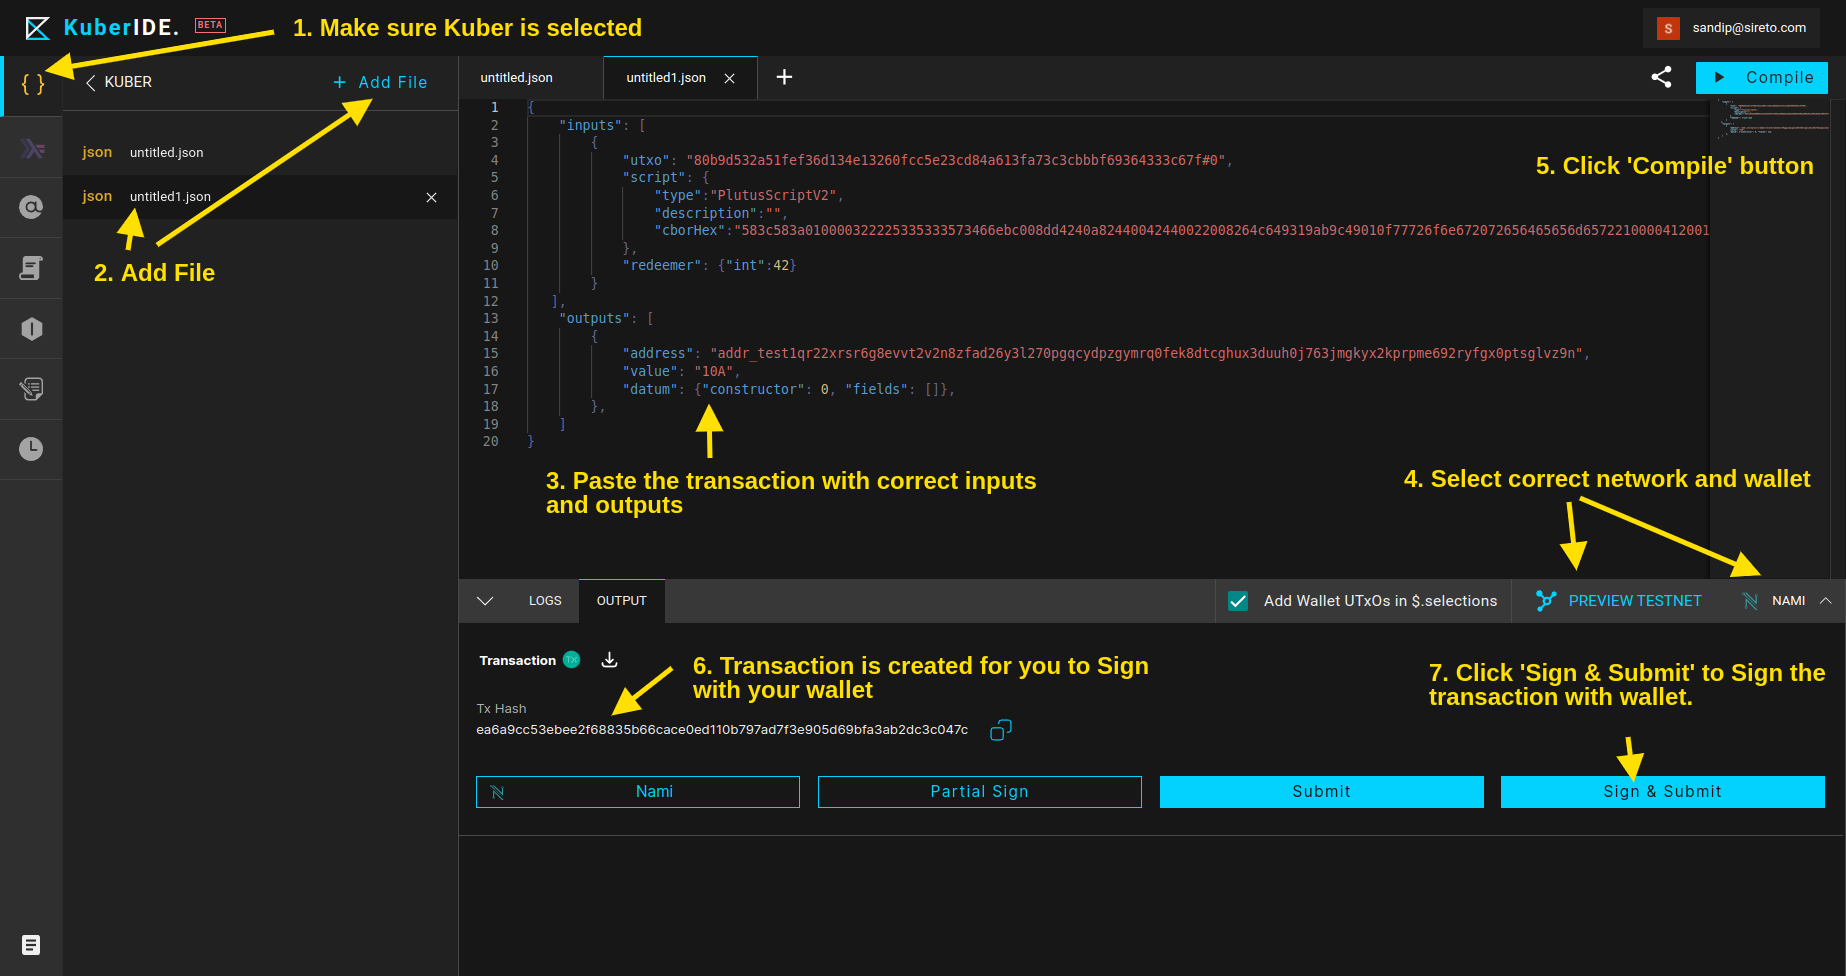
Here are the detailed steps for withdrawing from the contract:
- Select Kuber JSON Editor section on the IDE if it is not selected already.
- Select a json file or click
Add Fileif a file is not available. - Paste the above JSON transaction and do the following.
- Replace the address with the contract address from the previous section in theinputssection.
- Add the script json copied in the earlier section about compiling the contract inscriptsection.
- Addredeemerwith value{"int":42}.
- Replace the receiver wallet address on theoutputssection. - Make sure the correct network and wallet is selected.
- Click on
Compilebutton to compile the transaction. - Once the compilation is compile, you'll see the
OUTPUTtab on the bottom sheet with the transaction hash and a few action buttons. Copy and save the transaction hash. We'll need it to withdraw from the contract. - On the bottom right side of the
OUTPUTtab, you'll findSign & Submitbutton. Click on this button to sign the transaction. It'll open wallet pop-up window for you to sign the transaction as shown below. Once the signing is complete, the deposit is done. To let the transaction being mined, might need to wait a few minutes.
Once the transaction is done, the amount (10 Ada) is transferred to the withdrawer address from the contract.
In summary, KuberIDE makes it super easy to compile and deploy Plutus smart contracts and then compose transactions to interact with the contract. No need to setup anything, just get started quickly with KuberIDE for FREE.
Check Kuber API reference: https://kuberide.com/kuber/docs/intro/.